Aurora is on version 2.5.0 C#, available at the Aurora Forums.
Contact Erik on the forum for a wiki account.
C-Ground Combat
Ground Combat Rules
Basics
Ground combat is conducted after the naval combat phase of each increment. One combat round will be performed for every three hours that passed in the increment. Combat potentially takes place on any system body where populations exist from two or more hostile powers. If only one side has ground forces present, there may be a conquest (rules and code TBD). If ground forces are present from two or more hostile powers, ground combat will take place. Date 14.10.2018
Field Positions
Combat involves three (four) locations, Front-Line, Support or Rear-Echelon. Units in a Support position can only attack using bombardment weapons, or defend themselves against air attack. This formation is intended to serve in the Support location and is organising accordingly. However, it is possible for a Support Formation to temporarily find itself moved into a Front-Line position, so the Guardsman Element will provide additional protection in that case. 21.02.2018
Ground forces can be assigned one of four field positions; front line attack, front line defence, support and rear echelon.
Units in support and rear echelon positions cannot directly attack hostile forces but if they possess elements with bombardment weapons they may be assigned to support a front line formation.
Support and rear echelon formations can also potentially provide anti-air cover (more in a rules post on ground-space interaction) and supply to front line units.
Only formations with all elements supplied can be placed in front line attack mode. Formations placed in front line attack mode lose any fortification bonus. Date 14.10.2018
Targeting
Each race involved in a combat on a system body creates a list of its own formations on that system body (even if in multiple populations), plus a list of hostile alien formations, even if they are from multiple alien races in multiple populations. Hostile formations are checked for their weighted size. This is based on actual size for front line size, 25% for support and 5% for rear-echelon. Each hostile formation is given a range for potential selection, based on its weighted size.
Each front line friendly formation randomly targets a hostile formation. Friendly units with front line defence can target hostile front line formations. Friendly units with front line attack can target any hostile formation, although support and rear echelon are less likely given their smaller weighted size. In fact, the more formations that are pushed into front line positions, the less likely it is that rear areas will be attacked.
Support and Rear Echelon formations that contain formation elements with bombardment weapons can be assigned to support front line formations that are part of the same organisation.
Formations in a support position with light bombardment weapons will fire with the front line formations (see next paragraph). Formations in a support position with medium/heavy bombardment weapons or formations in a rear echelon position with heavy bombardment weapons will fire in a subsequent phase - see below.
Once a front line formation (or a light bombardment element in the Support position) has been matched against a hostile formation, each friendly individual unit (a soldier or vehicle) in that formation engages a random element in the hostile formation, with the randomisation based on the relative size of the hostile formation elements. The targeting on an individual unit level represents that the different elements in a front line formation will generally be attacking in conjunction (infantry supporting tanks, etc.).
Once all front line attacks have been concluded, each unit in each element providing supporting bombardment will engage either the hostile formation being targeted by the friendly formation they are supporting, or one of the hostile formation's own supporting elements (counter-battery fire). If the hostile formation is targeted, each unit in the supporting artillery element engages a random element in the hostile formation, with the randomisation based on the relative size of the hostile formation elements (the same as front-line vs front-line). If a hostile supporting element is targeted, all fire is directed against that element. This represents the difference between providing supporting fire in a combined arms front-line battle and targeting specific hostile artillery for counter-battery fire. The decision to target the hostile front-line formation vs hostile support elements is based on the relative sizes.
Supporting medium artillery will choose between hostile forces in Front-Line or Support field positions (and will ignore any elements in Rear Echelon field position for purposes of relative size), while heavy artillery can select targets in any field position. In other words, if the enemy has supporting heavy artillery in a rear echelon position, you will only be able to target those elements with your own heavy artillery (or ground support fighters, or orbital bombardment support).
Supply Check
When a formation element is engaged in combat against a hostile formation element, supply is checked. If supply is not available, the number of units firing will be 25% of normal. Date 14.10.2018
Combat Modifier and Results
Each attacking unit uses the following process:
- The To Hit Chance is determined. The base chance is 20% multiplied by the Dominant Terrain To Hit Modifier, the firing element morale / 100 and, if the target is not fortified, the base to hit chance for the target element unit class.
- The Fortification Modifier for the target element is determined, which is the current fortification level of the target multiplied by the Dominant Terrain Fortification Modifier. If the target is not fortified, the Fortification Modifier is 1.
- The Environment Modifier is calculated, taking into account gravity, pressure and temperature and whether the firing element has capabilities in those environments. Each environment for which the element is not trained has a x2 modifier.
- The Terrain Capability Modifier is calculated. If the element is trained to fight in the dominant terrain, the modifier is 0.5.
- The Final Chance to Hit is calculated as To Hit Chance / (Fortification Modifier * Environment Modifier * Terrain Capability Modifier)
- The unit fires each weapon it has (except for non-bombardment weapons on units bombarding from support and rear-echelon field positions). If the to-hit roll is equal or less than the final chance to hit, the weapon has struck the target.
- If a hit is scored, the armour-piercing (AP) value of the weapon is checked against the armour of the target. If AP is equal or greater than armour, the shot has penetrated. If AP is less than armour, the percentage chance to penetrate armour is (AP / Armour)^2.
- If the shot penetrates armour, the percentage chance of destroying the target is equal to (Weapon Damage / Target Hit Points)^2.
- If a target is destroyed, the firing element gains morale and the target element suffers a loss of morale. This morale gain/loss is doubled if the firing unit is in front-line attack mode.
All combat is conducted simultaneously and losses are applied once all firing is completed. Because of the way the above is structured, multi-way conflicts with multiple races on each side are possible.
Breakthough
Once all the initial combat is complete, there is a chance for a breakthrough. Each defending formation is checked according to the following procedure:
- A Cohesion Damage value is determined for each formation element using the following formula: Element Class Size * Units Destroyed in Combat Phase * (100 / Element Morale)
- The total Cohesion Damage is summed for all elements in the formation and compared to the formation size. This value, from 0 to 100%, is the Formation Cohesion Rating
- For each front line formation that attacked the defending formation, a Breakthrough Value is determined for each formation element
- Static elements have zero Breakthrough Value. Vehicle elements use the following formula: Element Class Size * Element Units * (Element Morale / 100). Infantry elements use the same formula as vehicles with a further modifier of 0.5.
- The total Breakthrough Value is summed for all elements in the attacking formation and compared to the formation size. The value is multiplied by 2 if the formation has a field position of Front Line Attack. This value, from 0 to 200%, is the Formation Breakthrough Rating
- A Breakthrough Potential value is determined for the attacking formation by multiplying the defending Formation Cohesion Rating by the attacking Formation Breakthrough Rating. If this value is equal to or greater than 30%, a breakthrough has occurred for that attacking formation.
- Each formation that creates a breakthrough mounts a second attack. This attack does not benefit from supporting artillery or fighter support. However, it functions as if the attacking formation has a field position of Front Line Attack, which means all hostile formations are potential targets, not just those on the front line.
The breakthrough rules mean that defending formations that suffer casualties may allow attacking formations to penetrate their lines and conduct a second attack.
This is more likely under the following circumstances:
- A single defending formation is attacked by multiple attacking formations,
- the defender suffers a high casualty percentage in a single ground combat round (potentially because the formation is small in size),
- the defender suffers disproportionate casualties to elements with larger unit classes,
- the defender is low morale,
- the attacker is primarily vehicle-based,
- the attacker is on front-line attack,
- the attacker is high morale.
Ground Formation Support Artillery
Basics
Support and Rear Echelon formations that contain formation elements with bombardment weapons can be assigned to support front line formations that are part of the same organisation. Date 14.10.2018
Setting Support
http://www.pentarch.org/steve/Screenshots/FormationSupport001.PNG
Here is a screenshot of the UI for setting support relationships between superior and subordinate formations.
You drag the superior formation on to the subordinate formation. If the Support checkbox is checked, the supporting formation is shown in blue-grey with the name of the supported formation. Any supported formation in shown in orange.
Support can only be provided when the supporting formation is a superior formation in the hierarchy of the supported formation, or is directly subordinate to a superior formation in the hierarchy of the supported formation and does not itself have any subordinate formations (an independent artillery formation for example).
Supporting formations must be on the same system body as the supported formation.
In combat, the support relationship will only function if the supporting unit has suitable bombardment units and is in a support or rear echelon position and the supported unit is in a front line position.
The drag-drop is intelligent and can distinguish between setting support relationships, reassigning formations to a new headquarters, removing headquarters assignments, moving formations from one population to another (on the same system body) and moving elements between formations (more on that last option in the next post).
Ground Support Fighter
Fighters equipped with Fighter Pods can provide support to ground unit formations during ground combat.
To be eligible, a fleet with fighters is given an order to "Provide Ground Support" with a friendly population as the destination. This order functions in a similar way to a 'Follow' order, with the order remaining in place until removed by the player.
On the Ground Combat Window, eligible fleets appear in their own section for each population. These fleets can be dragged and dropped on to formations in the same way as superior and subordinate formations. Fleets with this order that are at their target population cannot be targeted in normal naval combat or by STO weapons.
In combat, the ground support fighters attack at the same time as bombardment elements and have the same target selection options as heavy bombardment.
Ground support fighters have the same chance to hit as ground units, although they are not affected by any negative environmental modifiers (such as high gravity or extreme temperatures). Each fighter's to hit chance is affected by its own crew grade and morale.
Each Forward Fire Direction component in a formation allows support from up to six ground support fighters. If more fighters are assigned to a formation than can be supported, the chance to hit is modified by (Number of FFD * 6) / Number of Fighters.
http://www.pentarch.org/steve/Screenshots/GroundSupport006.PNG
Fortification
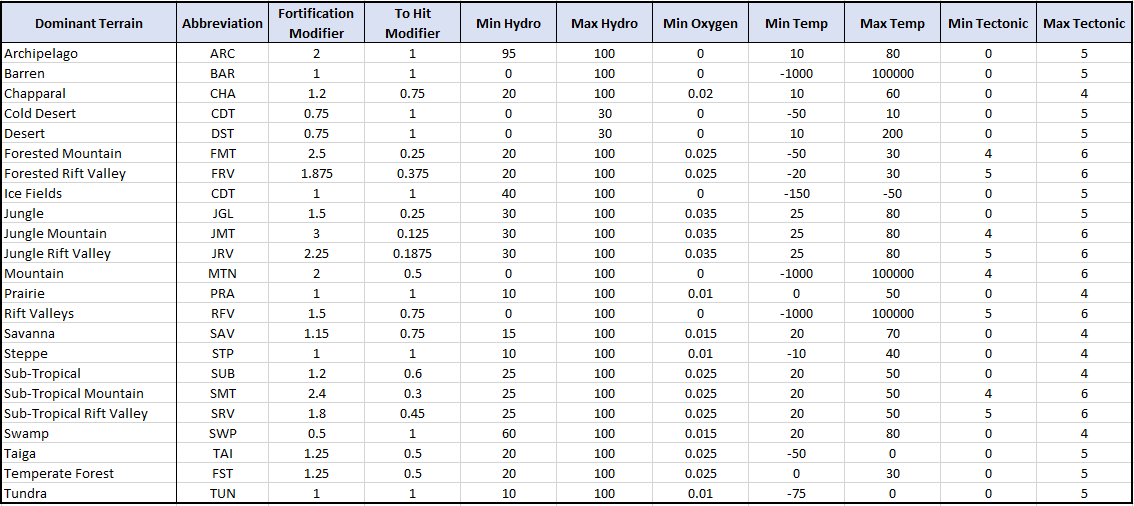
Fortification Modifier by Terrain
The fortification modifier is a modifier for the max fortification level, rather than an automatic defence increase. It means you can dig in much deeper (given sufficient time) in Mountains than you can in Steppe or Swamp. The to hit modifier is a reduction in the chance to hit in that terrain (for other ground units and any supporting ships in orbit). In effect, fortification is a benefit to the defender, while to hit is a penalty to both sides. Within the new ground combat rules, you can assign ground units 'capabilities', such as Jungle Warfare, Mountain Warfare, etc. which will double their chance to hit in those types of terrain. Ground units of species with certain types of home world may gain capabilities for free (if you are from a desert planet, you would gain Desert Warfare for free, for example). There are additional capability options to avoid penalties for ground units fighting on worlds that are outside their species tolerance for gravity, temperature and pressure.
An important factor to bear in mind is that when ships are engaging ground units with surface-to-orbit capability, the main defence of the ground unit will be its fortification level. The ship-based weapons are assumed to hit 100% of the time divided by the fortification level. On a planet with Steppe as the dominant terrain type, the maximum fortification of a static ground unit will be 6 with no penalty for the ship to hit. On a Jungle Mountain world, the maximum fortification level will be 18 for that same ground unit and any shots against it by the ships will be modified by 0.125, giving the ground unit an effective fortification level of 144. In other words, the ship in orbit is going to hit once every 144 shots. So trying to use orbital bombardment against surface to orbit units buried in jungle-covered mountains is going to be a Bad Idea. It would be far more effective to send in ground forces (which can't be hit by STO units) to dig them out. That is an extreme example, but there should be many more situations where there are some serious decisions for the attacker.
http://www.pentarch.org/steve/Screenshots/DominantTerrain.PNG
Ground Force Logistics
Basics
Ground Units have two separate logistics requirements. The first is Maintenance, which applies to all units at all times and has a wealth cost equal to 12.5% of Ground Unit cost per annum. The second is Ground Supply Points (GSP), which applies only to combat units during ground combat.
The GSP requirement for a weapon component is equal to Penetration Value * Damage Value * Shots. For example, Personal Weapons is (1 x 1 x 1) = 1. Crew Served Anti-personnel is (1 x 1 x 6) = 6. Medium Anti-Vehicle is (4 x 6 x 1) = 24. Heavy Bombardment is (2 x 6 x 3) = 36.
The GSP requirement for a Ground Unit Class is the sum of its weapon components. For example, a tank with a Medium Anti-Vehicle component and a Crew Served Anti-personnel component would have a GSP requirement of 30.
The GSP requirement for a Formation Element is the GSP for the Ground Unit Class in the element multiplied by the number of units. The GSP requirement for a Formation is the sum of the GSP for its constituent Formation Elements.
In all these cases, that is the GSP cost to provide sufficient supply for ten combat rounds.
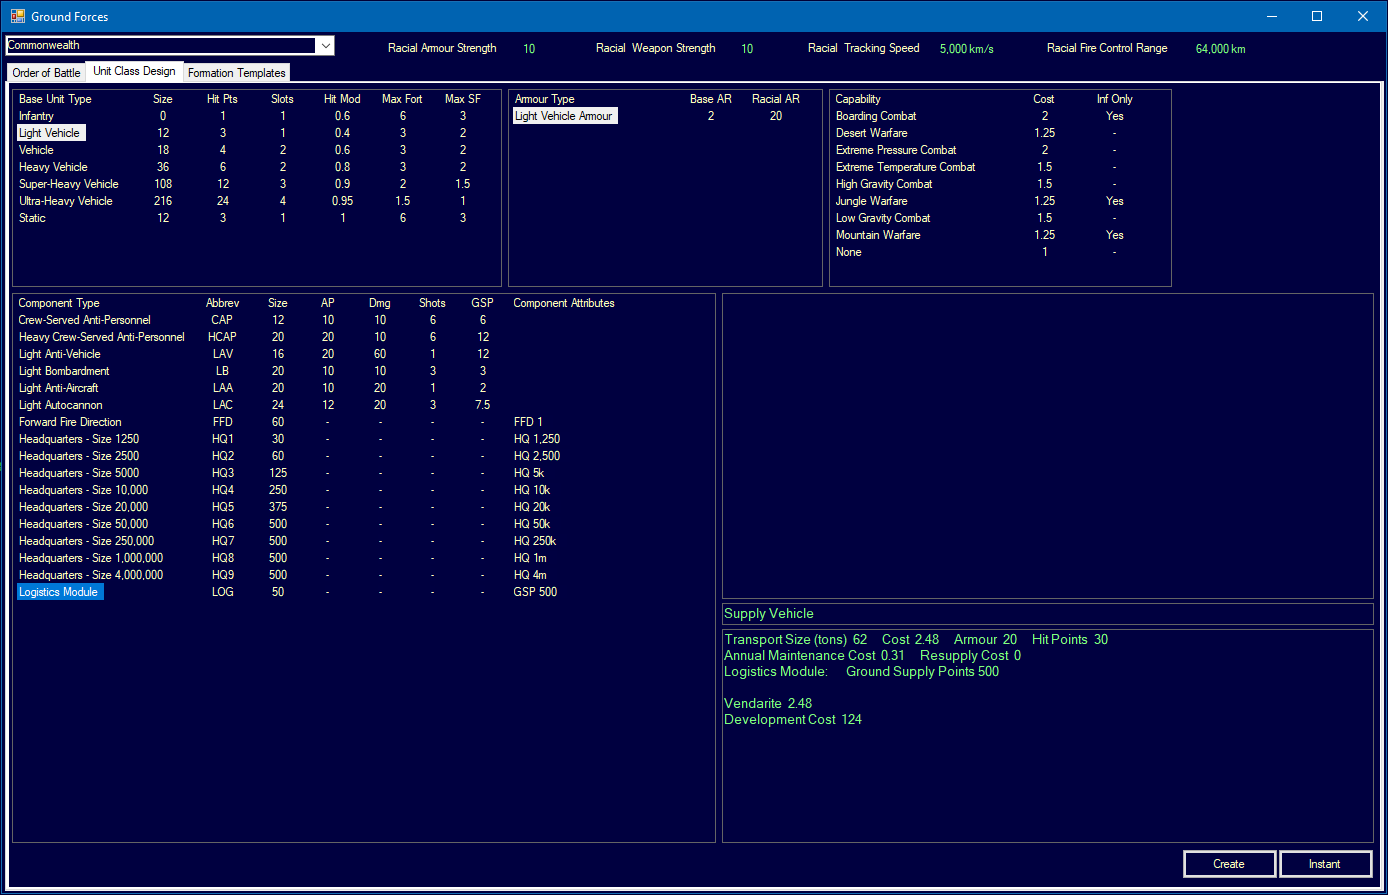
Two new ground unit components have been added; the Logistics Module, which is Size 50 and provides 500 GSP, and the Logistics Module - Small, which is Size 10 and provides 100 GSP. The standard module is available for light vehicle and infantry base types, while the small module is only available to infantry. Here is an example of a light vehicle with the Logistics Module.
http://www.pentarch.org/steve/Screenshots/SupplyVehicle02.PNG
Ground units with either logistics module can be added to any level of the ground force hierarchy, either embedded with the front line combat formations or held at a superior formation, such as a headquarters.
Supply Consumtion and Out of Supply
Each Ground Unit has sufficient inherent supply points to fight ten rounds of combat (currently one round takes place every three hours). After that point, only one quarter of units in a formation element that is out of supply will fire in each round. In addition, a formation with out of supply elements cannot use a field position of 'Front Line Attack' (more on this when I publish the full ground combat rules). However, if units with logistics modules are available, ground units can draw supply to both fight the current combat round and replenish supplies used in previous combat rounds.
Ground Units will attempt to draw supply from the formation that sits highest in their hierarchy and is at the same population. If no supply is available, they will move down the hierarchy to their own parent formation, checking at each stage. However, when drawing supply from outside their own formation, units can only draw on logistic modules mounted on light vehicles. Logistics modules with an infantry base type can only supply their own formation.
| For example, a formation element of 10 tanks engaged in combat is part of an armoured formation with a brigade HQ formation above it and a division HQ formation above that. The tanks will check for a vehicle-based logistics element within the division formation first, then a vehicle-based logistics element within the brigade formation and finally either type of logistic element within their own parent formation. If no logistic elements are available, the tanks will use their inherent supply, although they can only use that inherent supply for ten combat rounds, unless resupplied. If a unit does not require a full resupply (for example, it still has sufficient inherent supply for eight combat rounds), it will only draw an appropriate fraction of its normal GSP requirement (in this case 20%). |
When a formation element of logistics units provides supply, a number of units will be consumed based on the supply required.
| For example, assume the 10 tanks above each have a GSP requirement of 100, which is 1000 for the whole element. If they draw on a logistics element using light vehicles with normal logistics modules (which have 500 GSP each), two of those logistics vehicles would be consumed. |
When the GSP requirement does not neatly fit into the 500 point granularity, there is a chance of an additional logistics vehicle being consumed. This chance is dependent on the fraction of supplies required.
| For example, if there were 12 tanks with a requirement of 1200, then two logistic vehicles would be consumed and there is 40% chance (200 / 500) than a third vehicle will be consumed. |
This adds an element of uncertainty, as supplies may be consumed faster or slower than normal (although it will average out over time), plus it avoids any tracking of partial supplies per vehicle.
Examples
Below is an example of a Formation Template for a Brigade Headquarters that includes 50 Supply Vehicles.
http://www.pentarch.org/steve/Screenshots/Logistics003.PNG
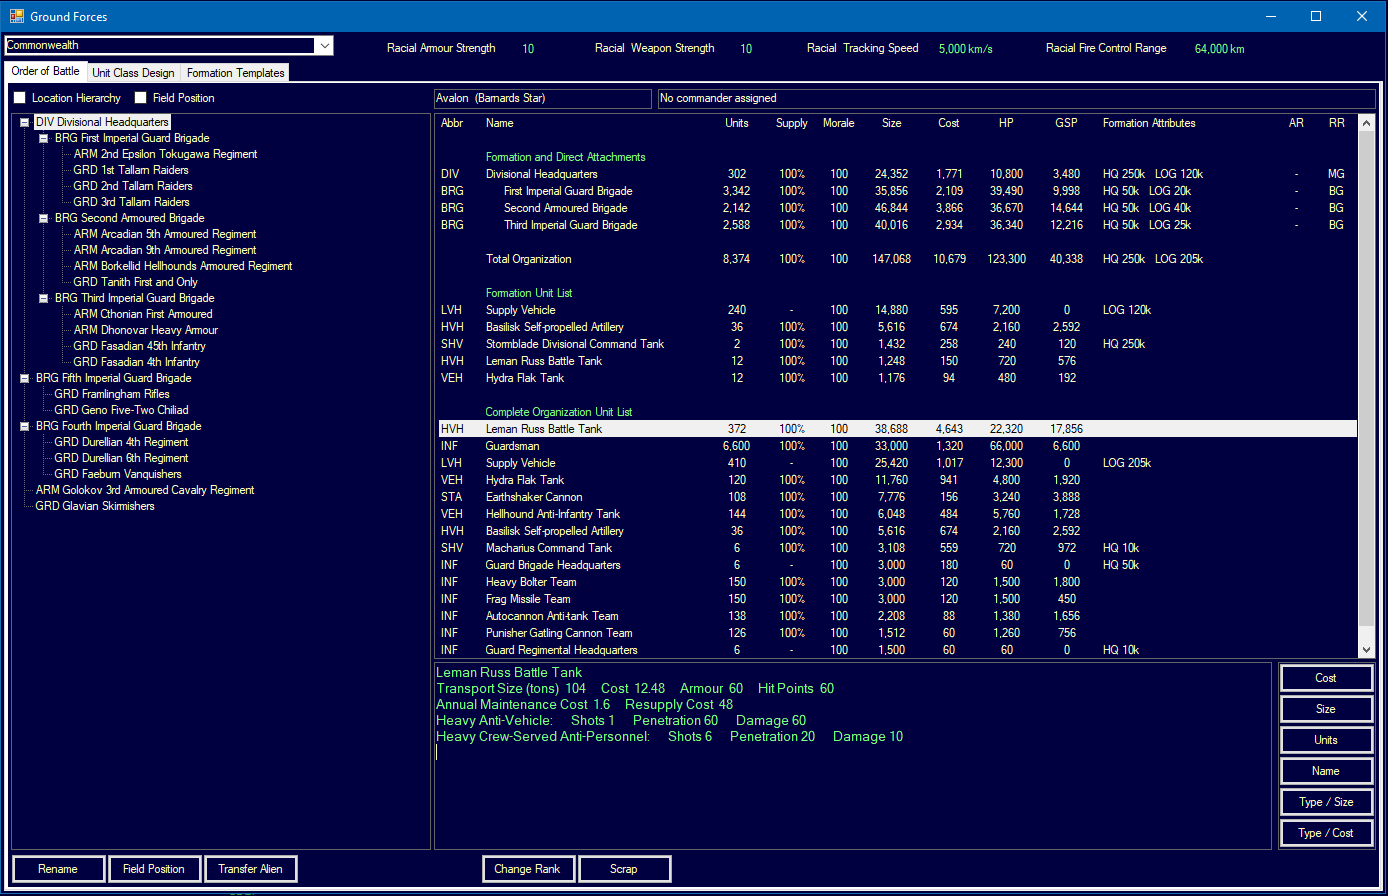
Below is an order of battle for a divisional formation. At the divisional level are 240 Supply Vehicles, indicated by LOG 120k (120,000 supply points) in the Formation Attributes column, with smaller numbers within each brigade headquarters formation. The GSP column shows the resupply requirement for each formation or formation element. The total divisional organisation requires 40,338 GSP for a complete resupply and there are sufficient supply vehicles (410) in that organisation to resupply five times. With the inherent supply as well, the entire division can stay in combat for sixty rounds before additional supply vehicles are required.
http://www.pentarch.org/steve/Screenshots/Logistics004.PNG
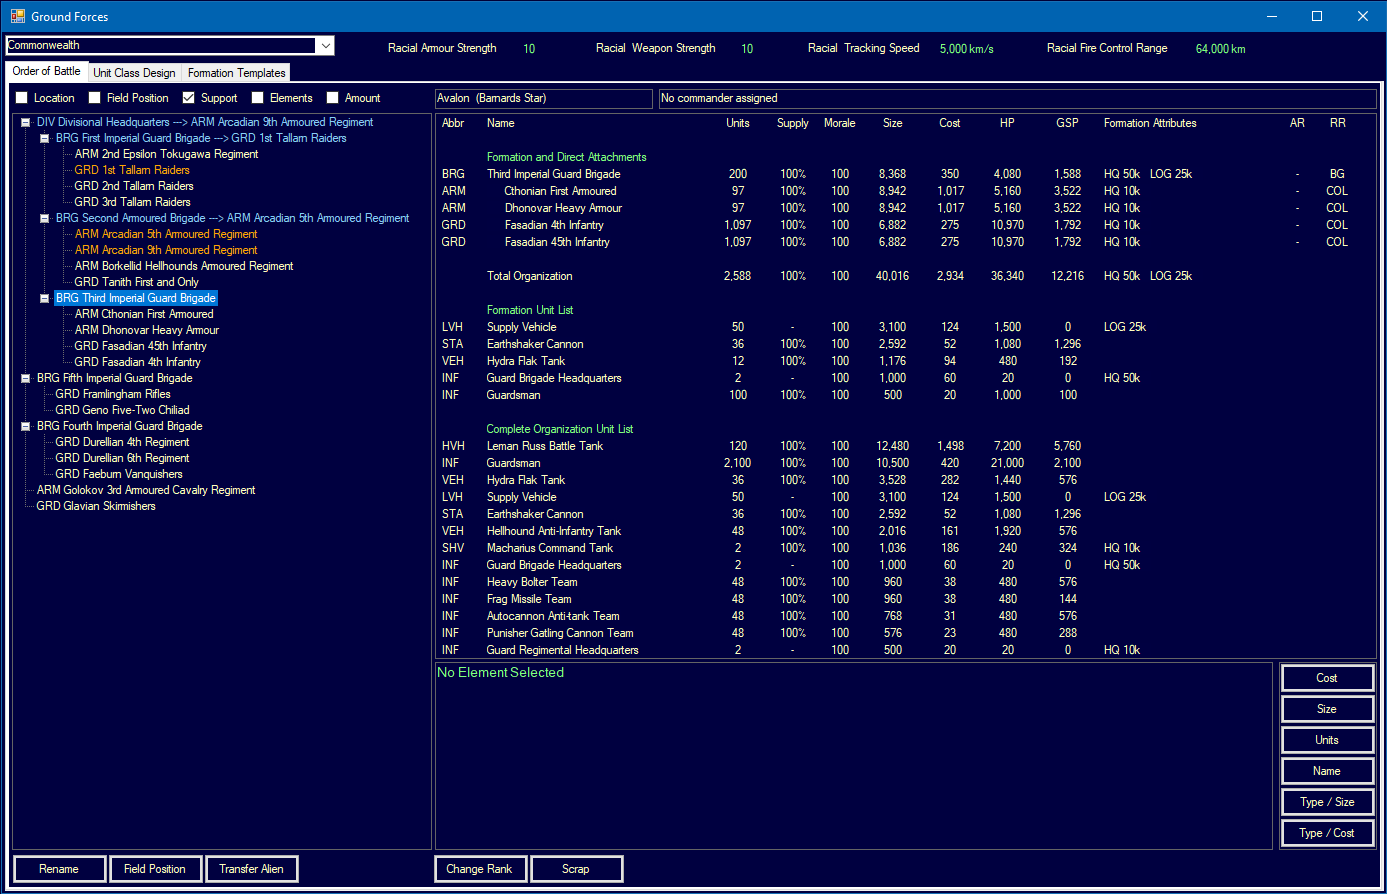
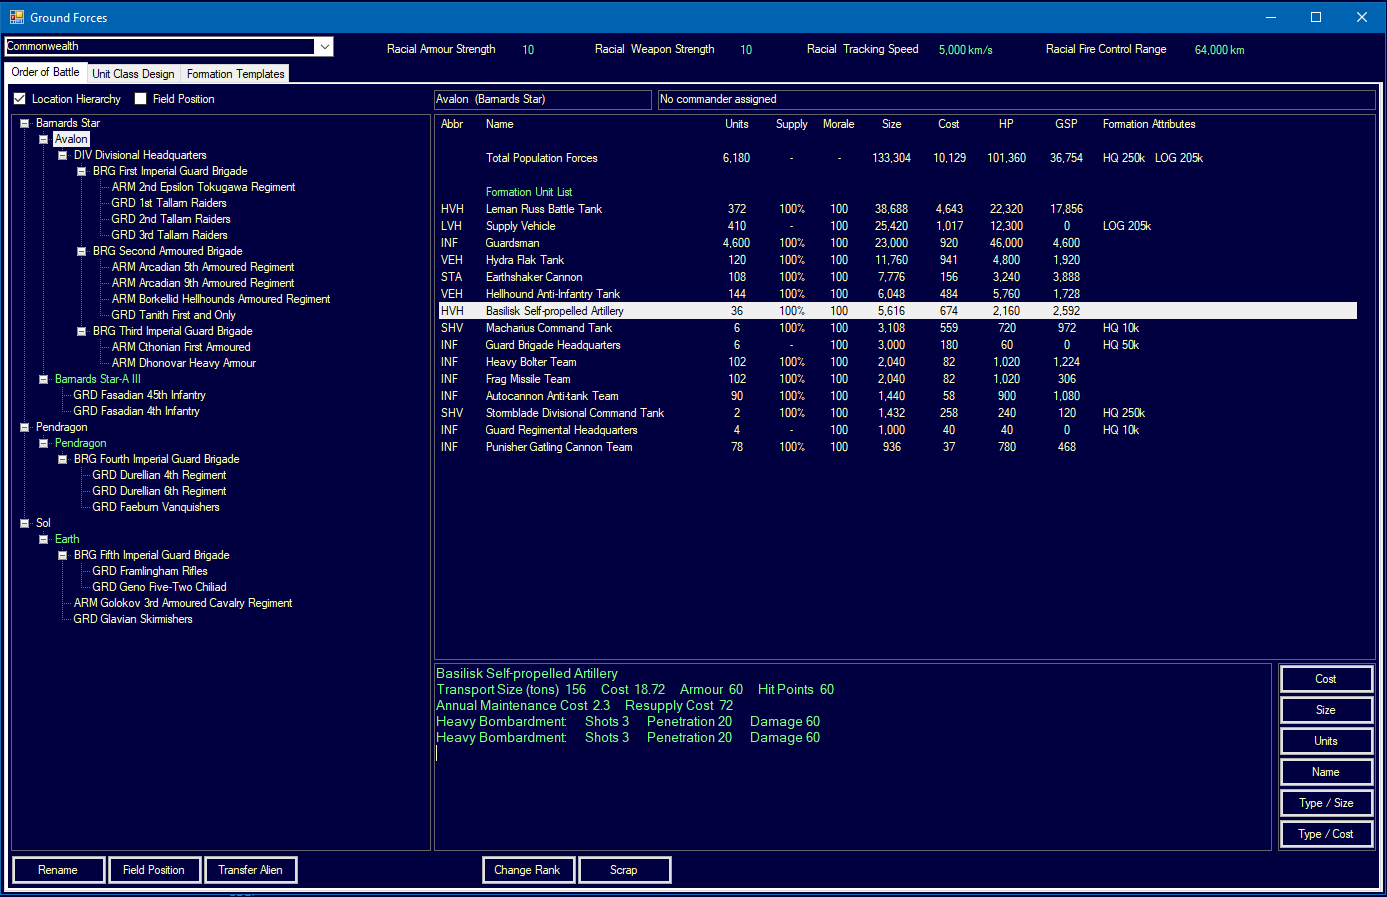
Finally here is a view of a single population, with the order of battle tab in Location mode.
http://www.pentarch.org/steve/Screenshots/Logistics005.PNG
Space to Ground & Ground to Space Combat
Basics
Atmosphere and Energy Weapons
In C# Aurora, there is no penalty for energy weapons firing in or through an atmosphere. Date 07.04.2018
Point Defence
In C# Aurora, fire controls set to 'Final Defensive Fire' or 'Final Defensive Fire (Self Only)' will fire on hostile missiles, regardless of whether the fire control is set to 'Open Fire'. Fire controls set to Area Mode or for AMMs will only fire defensively when that fire control is set to 'Open Fire'.
When a missile reaches its target, a target ship will use its CIWS first. If that is insufficient, it will use any weapons linked to fire controls set to 'Final Defensive Fire' or 'Final Defensive Fire (Self Only)'. If that is still insufficient, ships or the same race or an allied race with fire controls set to 'Final Defensive Fire' will be checked in increasing order of distance from the target ship.
A target population will use any ground units assigned to point defence to shoot at incoming missiles. If that is insufficient, the same process as for ships will take place, checking same race or allied ships within point defence range of the planet.
Planetary Bombardment
In C# Aurora, populations can be attacked by missiles and energy weapons. However, because missile warheads are area-effect weapons, they are much more effective at destroying the civilian population and any installations.
Each installation type has a Target Size. The chance of each attack (either a missile or a single energy weapon) destroying an installation is equal to: Weapon Damage / Target Size.
| For example, a construction factory has a Target Size of 20, so a 10cm laser fired from orbit would have a 15% chance to destroy the target (3 / 20). For the purposes of this check, missile warheads are treated as equal to 20x warhead strength. Therefore, a single 1 point warhead has a 100% chance to destroy a construction factory. |
A single energy weapon can destroy only one target per hit. A missile warhead is applied until all damage is used.
| For example, a 5-point missile warhead is counted as 100. If the first installation hit is a construction factory, that factory is destroyed and the remaining damage reduced to 80. That damage is then applied the next installation hit and so on. |
Missile warheads cause radiation and dust levels to increase by an amount equal to their warhead size. Energy weapons increase the dust level by 5% of their damage amount.
Missile warheads inflict civilian casualties at the rate of 100,000 per point of damage. Energy weapons inflict civilian casualties at the rate of 2,000 per point of damage.
Populations will no longer surrender purely due to orbital bombardment. You have to land ground formations to force a surrender.
Energy weapons now provide a way to destroy the industry and infrastructure of a target population, without causing radiation or using up ordnance. However, this will require considerable effort for a large population and consume maintenance supplies due to weapon failures. It will also bring you within range of any ground-based energy weapons. Of course, it will usually be more beneficial to conquer the planet and gain the installations instead of destroying them.