Aurora is on version 2.5.0 C#, available at the Aurora Forums.
Contact Erik on the forum for a wiki account.
VB6 Aurora:Quickstart for Beginners
This is a very basic quickstart tutorial for people trying the game out, or trying to learn the basics of how the game works.
Also see the list of tutorials.
Starting a Game
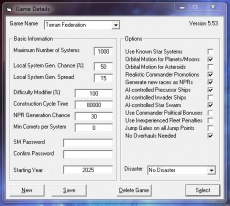
When you first open Aurora, you will be greeted with the screen shown to the left.
When first opened, this will display details for 'The Space Race', the developer's saved game. To create a new game, you will need to click on the New button to the bottom left of this window.
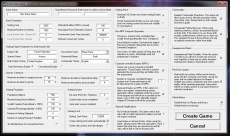
The Create New Game window displayed may be intimidating with its plethora of options, however for the moment we are going to leave most of them alone.
First, you will want to give your game a name using the box in the top left. This is used when selecting which saved game you want to play on the main screen. You may also want to change the name of your Empire using the 'Empire Title' text box and maybe change the 'Main Empire Theme' selection and 'Commander Theme' selection. These options are just cosmetic, and control the automatic names that your empire will use for newly discovered star systems, ship designs and newly trained commanders. You can manually rename these items to whatever you choose, or change the themes later in the game if you wish.
On the far right of the screen there are a couple of things to change. Under Commanders the second check box is for commander political bonuses. Uncheck this box, and the box below this for Inexperienced Fleets. They both add complexity that can confuse the beginner. The other thing to change is in the bottom middle of the screen is a box titled Starting Tech. Check the box for create starting systems and ships. This will create your initial ship designs. One warning, you may not be able to build them based on the size of your shipyard.
Now press the Create button to generate your galaxy! There will be a couple of things to click on while you wait, but you will get back to the game details screen. Press Select to start your new game.
Getting Started and the System Maps screen
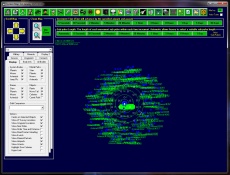
Upon entering your newly created game, you will see a menu bar named after your game. To open the main game window, select the 'Empires' menu from the bar, then select System Map F3. This screen is effectively the main game window, and almost all other windows can be accessed directly from this page using the icons along the top.
Immediately underneath the top line of icons are the 'time advance' commands. These are used to control the passage of time in the game. Aurora is a turn based game, but you can select to use turns of different lengths - when you are just building up your infrastructure and researching you will probably use 5 or 30 day turns, but when entering combat the game will slow to turns of a minute or even 5 seconds at a time. The game only advances when one of these buttons is clicked so you can take your time on the turns!
Note that all AI players are subject to the same rules as the player regarding passage of time, and the game will automatically detect when it needs to drop to combat length turns. This may mean that even if you select to make a long turn, the game may stop after a shorter period due to combat between other AI players.
The rest of the screen is taken up with the system display, and its associated controls. In the centre of the screen will be a display of all the bodies within the Sol system, the birthplace of the Human race and the location of Earth. By default, the zoom level will be set to display all system bodies, but if you wish to zoom in closer, or scroll around, you can control this using the scroll map and zoom map buttons to the top left. In the Display/Display 2 tabs are options for controlling what is shown in the main body of the screen. Maybe switch off display of asteroids and moons for now.
It is important to note at this point that pretty much everything in Aurora is randomly generated, this may mean that your Sol system looks slightly different to this one. The generation of the Sol system actually has some exceptions to this in that it is hard-coded to produce the correct planets and moons, but asteroids and comets will all be generated at random, as will the availability of resources on the system bodies. This randomness will also mean that the starting technology which has been granted to the writer of this tutorial may differ from the technology available to you.
Assigning Colonial Adminstrators
Press F2 to bring up the Population and Production screen.
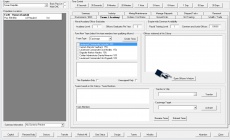
This screen has a bunch of tabs on it to make it easier to navigate. The first thing to do is go to the Team/Academy tab. In the Right-Center is a button for Open Officer Window. Click it, then when it comes on click the check box in the upper left for automated assignments. This will have the game automatically assign officers to ships, and ground units. It will not assign leaders to colonies however, this is something you need to do.
On the upper left is a pulldown for the type of leaders. It starts out showing naval officers. Choose Civilian Administrators. In the middle of the screen is a window that shows the Potential Assignments. There will be a list of colonies and to the left is A#. The number indicates what rank your administrator (A) needs to be for this colony. It will probably be an A3. On the far right of the screen there is a search function. On ability A pick Administrator rating. This will automatically sort all of your admin people by their relative seniority. If you click on the name of an administrator, their abilities will be displayed at the top left (Ratings and bonuses). Pick an admin person that fits what you want your colony to do. For a starting game, I usually pick someone with a high mining bonus as it is very easy to run out of minerals to build things when you start.
After picking your administrator, close the screen and go back to the Population and Production menu.
Adding Installation Production Orders
Go to the industrial tab. This is where you will build most things except for ships. On the far left is a list of Population Locations. Clicking on them will change which colony you are looking at for everything else on this screen. Under the row of tabs is a pulldown menu for different types of things to build. Choose installations.
Most starting setups do not have enough mines for everything you want to do. Pick Mine under the list of things to build and then go to the area that says "Create Industrial Project For ...". Put the number to build at 200, and the percentage of industry at 20%. This will now use 20% of your industry to build a total of 100 mines. This is just to get you started.
Reserve a lot of capacity for building Construction Factories. You begin with only a small number of them, so have your factories build more factories. Keep this up for several years. You'll see your industrial capacity grow exponentially.
The same goes for Research labs. Each level of a certain technology is twice as expensive as the last, so you want a steady growth of lab capacity. Always reserve at least 5% of your industry to building labs.
You might want to build some Infrastructure as well. Put it at 500 and 5%. This will help when you want to start a new colony. For the rest of your industry, pick what you want to build. If there is not enough industry left for the percentage that you put in, that build order will be queued up and will start once enough industry is available from projects that have been completed.
Adding Shipyard Production Orders
The next tab to go to is Manage Shipyards. This is where you will build your ships. If you let the computer design your first ships then you can go directly to assigning designs to different shipyards. It usually helps to open up the ship design screen (F5) to check what each ship does.
Make sure that when you assign them that the biggest possible design is given to each shipyard. You do not want to have your largest shipyard capable of building 20000 ton ships working on 1000 ton gunboats. The first time you assign a design to a shipyard it happens immediately, afterwards it will take some time for the shipyard to retool to build the new design. While it is retooling you can continue to build ships that had already been started. You will not be able to start any new ships until you finish retooling.
You can build any ship you want in the military (naval) shipyards. Only civilian designs can be build in the commercial shipyards. Commercial/civilian designs tend to be much larger than military ships. Civilian shipyards start at 10,000 ton capacity and build up faster than military shipyards that start at 1,000 ton capacity. Play around with what you want to build. You will need one freighter design and one colonist design to start a new colony. To survey for warp points you will need a Gravitational Survey ship (this is going to be a military design). To survey for minerals on the planets, moons, and asteroids you will need a Geological Survey ship (this can be a civilian design). To transit a warp point you either need a ship with a jump engine, or you need an existing jump gate.
To build a ship, click on the shipyard and then go to the create task area. Choose which ship that this particular shipyard is capable of building and make sure that the task group the ship is being built in says 'Shipyard TG'. If a ship is being built in a TG that has ships in it the ships can not move without changing their TG (task group). Then click on the add task. Each shipyard has a number of slipways, each slipway can build one ship at a time.
Starting Research
The final thing to do before you can get started is to assign your scientists to different research projects. Go to the Research tab.
On the right side is a list of scientists with their area, bonus and the max number of labs they can use. To assign a scientist to a project you will need to click on the scientist, a technology (center screen) and then above the scientist screen designated the number of labs to use. Then click create.
A note about the scientists research bonus. The listed percentage is used to boost the points produced. If the technology being researched is from the same field as the bonus, the percentage is instead x4. A 25% bonus for energy weapons will add 100% if you are researching a laser size. This makes a big difference in getting projects done quickly.
To queue up a project for a scientist that already is researching something, you will need to click on the scientist up above, the technology you want him to research, and then the queue button on the bottom right. Try to use all of your labs in the fewest possible technologies until you get the hang of it.


